A vernier caliper is an instrument that is most commonly used for a variety of exact measurements, which was not necessarily related to the engineering manufacturer.
The main use of the vernier caliper is to measure the internal and external diameters of an object. The word caliper means any instrument with two jaws which is used to determine the diameters of objects.
The principle of the vernier caliper is that when two scales or divisions slightly different in size are used, then the difference between them is used to increase the accuracy of measurement.
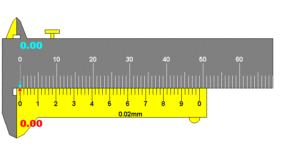
Vernier caliper consists of two steel rules and they can slide along with each other.
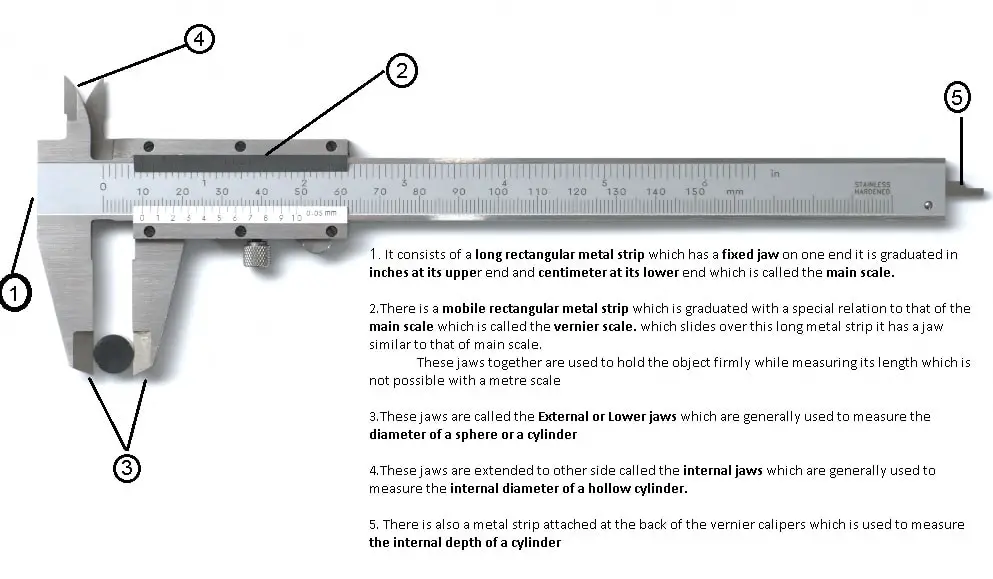
One is a long rectangular metal strip that has a fixed jaw on one end. It is graduated in inches at its upper end and centimeter at its lower end which is called the main scale.
The main scale is marked on solid L-shaped frames, on which cm graduates are divided into 20 parts so that a small division is equal to 0.05 cm. This allows improvements in the commonly used measuring techniques, over direct measurement with the line graduated method.
There is another small rectangular metal strip that is graduated with a special relation to that of the main scale, which is called the vernier scale which slides over this long metal strip it has a jaw similar to that of the main scale.
There are two jaws on the vernier caliper upper jaw and lower jaw. These jaws together are used to hold the object firmly while measuring its length which is not possible with a metre scale.
The external or lower jaws are generally used to measure the diameter of a sphere or a cylinder. The internal jaws or upper jaws are generally used to measure the internal diameter of a hollow cylinder.
There is also a metal strip attached at the back of the vernier calipers which is used to measure the internal depth of a cylinder.
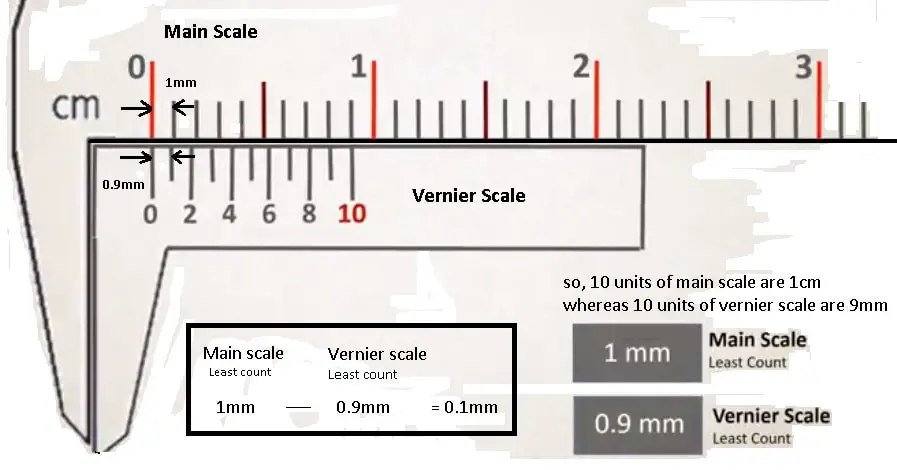
A scale cannot measure objects that are smaller than 1mm but a vernier caliper can measure objects up to 1mm. As already know the vernier caliper has two scales the main scale and the vernier scale together this arrangement is used to measure very small lengths like 0.1mm.
Here the main scale has the least count of 1mm and the vernier scale has the least count of 0.9mm. So therefore 10 units of the main scale is 1cm whereas 10 units of the vernier scale is 0.9mm.
The unit of the vernier scale is 9mm. So this difference between the main scale and the vernier scale which is 0.1mm is the working principle of the vernier caliper.
Vernier Caliper Least Count
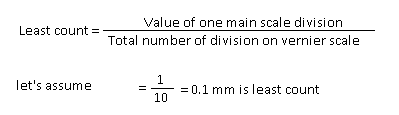
The difference between the value of one main scale division and the value of one Vernier scale division is known as the least count of the Vernier.
The least count of the vernier caliper is the smallest value that we can measure from this device. To calculate the least count of the vernier caliper is the value of one main scale division divided by the total number of divisions on the vernier scale.
Let’s assume that the value of one main scale division is 1mm and the total number of divisions on the vernier scale is 10mm then the least count will be 0.1mm. Thus, the least count is defined as the smallest distance that can be measured from an instrument.
Vernier Caliper Zero Error
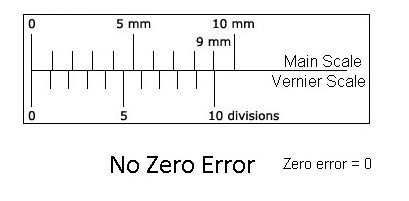
Zero error in the vernier caliper is a mathematical error. Due to this, the zero of the vernier scale does not coincide with the zero of the main scale.
In other words, if the zero mark on the vernier scale doesn’t coincide with the zero mark on the main scale, then the error that occurs is called zero error. They are of 2 types.
No zero error
Positive zero error
Negative zero error
No Zero Error
In no zero error, when we bring two jaws together. You will see zero of the Main scale coincides with the zero of the vernier scale. they are exactly in a straight line so this vernier caliper is free from zero error or you can say there is no zero error in this vernier caliper.
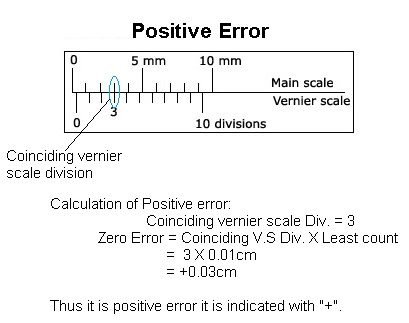
Positive Zero Error
In positive zero error, Let’s bring these jaws together. you see, the zero of the vernier scale is ahead of the main scale zero. Or you can say zero of the vernier scale is at the right side of the main scale zero.
In both cases either it is ahead of the main scale zero or it is on the right side of the main scale zero. This is called a zero error and it is positive.
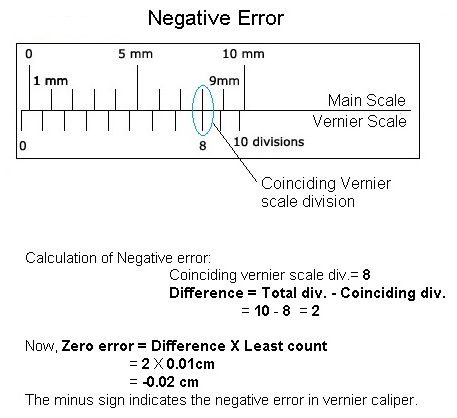
Negative Zero Error
In negative zero error, we will bring the two jaws together. Here you can see zero of the vernier scale is the back side of the main scale zero. Or to the left of the main scale zero.
So if the vernier scale zero is either backside or to the left of the main scale zero, in both cases, the zero error is the negative error.
Types of Vernier Caliper
Following are the different types of Vernier Caliper:
Flat edge vernier caliper
Knife edge vernier caliper
Vernier gear tooth caliper
Vernier depth gauge
Flat and knife edge vernier caliper
Vernier height gauge
Vernier dial caliper
#1 Flat Edge Vernier Caliper
This type of vernier is used for normal functions. We can take outer measurements of a job’s length, breadth, thickness, diameter, etc.
As the jib of its edge is of a special type, the inner measurement can also be taken with it. But from that measurement, the job breadth has to be subtracted. This measurement is often written on the jaw otherwise it should be measured with a micrometer.
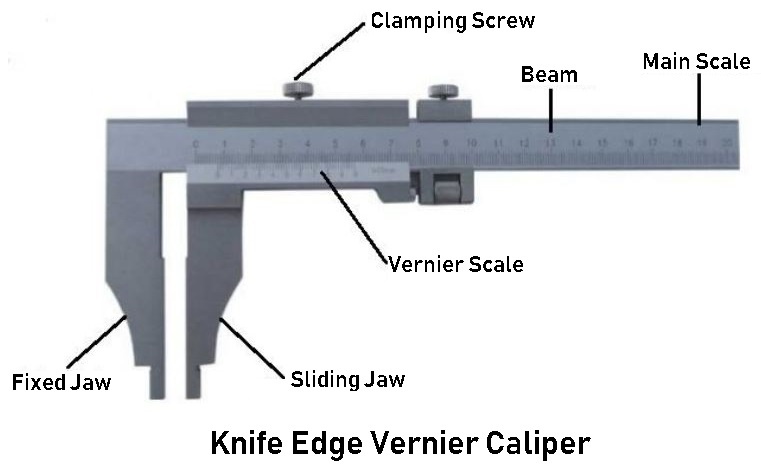
#2 Knife Edge Vernier Caliper
The edge of this vernier caliper is like a knife. Other parts of this vernier caliper are like other vernier calipers as shown in the figure. This vernier caliper is used for measuring narrow space, the distance of holes of I bolt, etc.
Its main shortcoming is that because of the thin edge of its jaw, it wears out quickly and starts giving inaccurate measurements. It should be used sparingly and carefully.
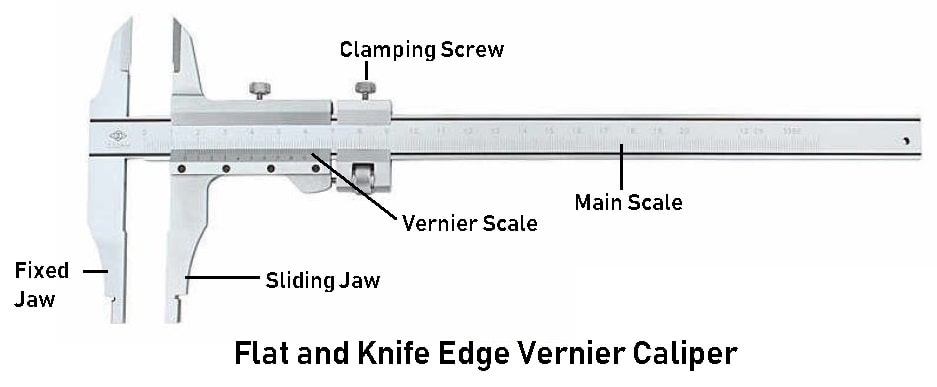
#3 Flat And Knife Edge Vernier Caliper
some companies also make vernier calipers which have their jaw like an ordinary vernier caliper from one side but have knife-edge jaw at the other side, as shown in the figure. With this vernier caliper, all types of jobs can be measured easily.
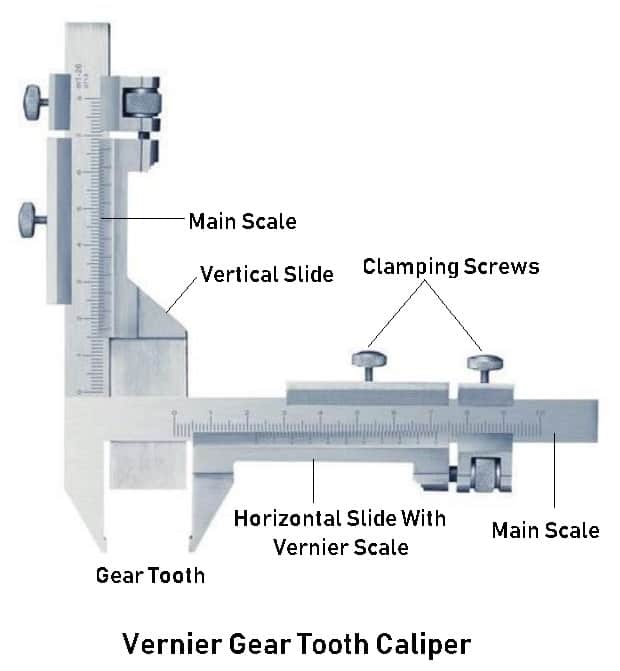
#4 Vernier Gear Tooth Caliper
This is a special type of instrument, which is made like a combined form of two vernier calipers. It contains two separate scales vertical and horizontal.
With the vernier caliper, the thickness of a tooth of gear can be taken from its pitch circle. In other words, the vernier caliper is used to measure different parts of the gear.
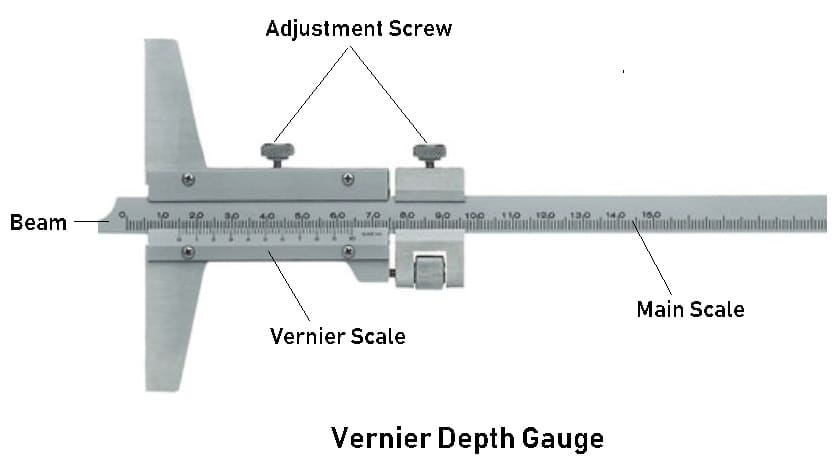
#5 Vernier Depth Gauge
As is evident from its name, this instrument is used for measuring the depth of the slot of a job, Its hole or groove. This is almost similar to the vernier caliper. Its reading is also taken in the same way. But instead of a jaw, a flat-shaped base is used in it.
This depth gauge is made of a thin beam like a narrow rule. The main scale and vernier scale are also in the inch or metric system. Its specialty is that we can measure three types:
Its main scale is marked in parts of inches which is divided into 64 sub-sections.
The other end is divided into 40 sub-sections and every fourth line is slightly bigger. It contains the local size in 1,2,3, to 9. On the same, there is a vernier scale, with whose help a minimum of 0.001″ measurement can be taken.
On its back graduation is in mm which can take a minimum measurement of 0.02 mm with the help of a vernier scale.
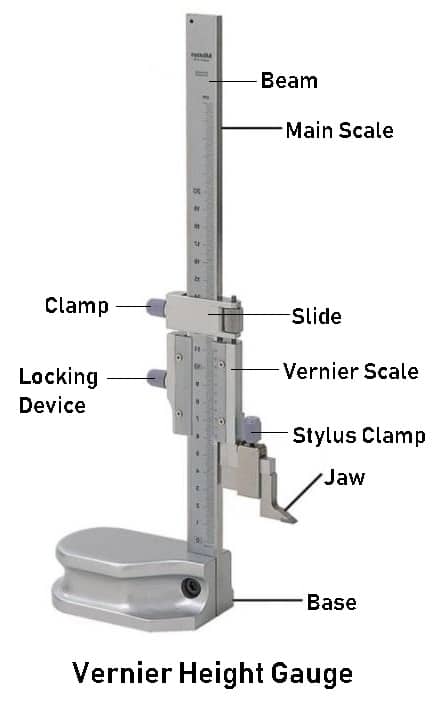
#6 Vernier Height Gauge
It is used for taking accurate measurements of the height of a job or for marking. It is almost similar to the vernier caliper but it is used by attaching some additional attachments.
The beam remains fitted on a base in length form. An offset scriber is fitted on the beam itself with which the height of a job is measured or marking is done. Its bases are of two types:
Solid Base
Moveable Base
In the vernier height gauge, the slide base remains joined with the beam permanently as shown. In this type of vernier height gauge, there is no facility to set the beam or base according to the requirement of the job.
In the moveable base vernier, this facility exists. This type of vernier height gauge is in the form of a set, which has a base vernier caliper, offset scriber fixing screw, etc. All its parts have been shown in the figure.
#7 Vernier Dial Caliper
In an ordinary vernier caliper, there are chances of mistakes as far as clear reading is concerned. For this purpose, nowadays Vernier Dial calipers are being used. In place of the vernier scale, it contains a graduation dial as shown in the figure.
Like vernier calipers, it can measure in inches as well as in millimeters. Like a dial test indicator, rack and pinion are used in it. The rack remains on the main scale which is connected to the pinion of the dial.
For using it movable jaw is moved by the thumb roller. For taking a reading, we have to check how many main and sub marks an inch the bevel edge of the movable jaw has crossed and add the reading, the needle on the dial gives.
Type A, B, and C Vernier Calipers
Vernier calipers are classified based on an international standard IS 3651-1974, according to this standard three types of vernier calipers have been specified to meet external and internal measurement requirements of up to 2000mm with the accuracy of 0.02, 0.05, and 0.1 mm.
Types of vernier caliper are termed as type A, type B, and type C.
Type A
This is made with only one scale on the front of the beam for direct reading.
It has jaws on both sides for external and internal measurements.
It is also having a blade for depth measurements.
The calipers are made of good-quality steel and the measuring faces are hardened to 650 HV. minimum.
The beam is made flat throughout its length to within the tolerances of
0.05mm for nominal lengths up to 300mm,
0.08mm from 900 to 1000mm and
0.15 for 1500 and 2000mm sizes.
The guiding surface of the beam is made straight to within 0.01mm for measuring the range of 200mm and 0.01mm for every 200mm measuring range or larger size.
As per IS 3651-1974 nominal sizes for measuring are
0-125, 0-200, 0-250, 0-300, 0-500, 0-750, 0-1000, 750-1500 and 750-2000mm.
The scale serves for both external and internal measurements.
The fixed jaw is made an integral part of the beam and the sliding jaw is made a good sliding fit along with the beam and made to have seizure-free movement along the bar.
Type B
It is made of only one scale on the front of the beam for direct reading.
It is provided with jaws on one side for external and internal measurement.
The beam is made flat throughout its length to within the tolerances of
0.05mm for nominal lengths up to 300mm,
0.08mm from 900 to 1000mm and
0.015mm for 1500 and 2000mm sizes. The guiding surfaces of the beam are made straight to within
0.01mm for measuring the range of 200mm and
0.01mm every 200mm measuring range of large size.
The main scale serves for external measurements and internal measurements are made by adding the width of the internal measuring jaws to the reading on the scale.
As per IS 3651-1974 nominal sizes for measuring are
0-25, 0-200, 0-250, 0-300, 0-500, 0-750, 0-1000, 750-1500 and 750-2000mm.
The scale serves for both external and internal measurements.
The measuring surfaces are given a fine ground finish and the portion of the jaws between the beam and the measuring faces are relieved.
The fixed jaw is made an integral part of the beam and the sliding jaw is made a good sliding fit along with the beam and made to have seizure-free movement along the bar.
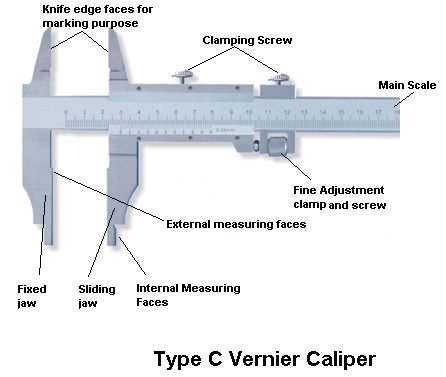
Type C
It is made of only one scale of the front of the beam for direct reading.
It has jaws on both sides for making the measurements and for marking operations.
The beam is made flat throughout its length to within the tolerances of
0.05mm for nominal lengths up to 300mm,
0.08mm from 900 to 1000mm and
0.15mm for 1500 and 2000mm sizes.
The guiding surface of the beam is made straight to within 0.01mm for measuring the range of 200mm and 0.01mm for every 20mm measuring range of large size.
As per IS 3651-1974 nominal sizes for measuring are
0-125, 0-200, 0-250, 0-300, 0-500, 0-750, 0-1000, 750-1500 and 750-2000mm.
The scale serves for both external and internal measurements.
The measuring surfaces are given a fine ground finish and the portion of the jaws between the beam and the measuring faces are relieved.
The fixed jaw is made an integral part of the beam and the sliding jaw is made a good sliding fit along with the beam and made to have seizure-free movement along the bar.
Working of Vernier Caliper
The sliding jaw runs on the main scale with the guiding surface, which is accompanied by a vernier scale, which has a measuring tip on the left side.
When two measuring tip surfaces are in contact with each other, the scale shows zero reading.
The finer adjustment of the movable jaw can be done by adjusting the screw.
First, the whole movable jaw assembly is adjusted so that the two measuring tips just touch the part to be measured. Then lockout B is tightened.
The final adjustment depending upon the sense of correct feeling is made by adjusting the screw, which makes the part containing locking nut A and sliding jaw move, as the adjusting screw rotates on a screw that is in a way fixed to the movable jaw.
After all, the final adjustment has been done, the locking nut has also been tightened and the reading has been noted. Measuring tips are designed so that they can be used to measure external dimensions as well as internal dimensions.
How To Use Vernier Caliper In Right Way Step-by-Steps
Clean both the part and the caliper completely so that it is free from burrs and other obstacles.
Loose clamping screws on both sliding jaws. Set the sliding jaw slightly larger than the measurable features.
Clamp nut carries to the beam. Snug up but do not lock the clamping screw on the movable jaw.
Place the fixed jaw in contact with the reference point of the part feature.
Align the beam of the caliper in both planes to be almost parallel to the line of measurements as much as possible.
Turn the adjusting nut so that the movable jaw just touches the part.
Tighten the clamp screw on the movable jaw without disturbing the feel between the caliper and the part.
Read in place without disturbing part of a caliper, if possible, otherwise remove the caliper.
Record the reading on paper, mark on the part, or part drawing.
Repeat the measurement steps a sufficient number of times to rule out any incorrect reading and average the others for the desired measurement.
Loosen both clamps, slide the movable jaw open, and remove work, if not already done.
Clean, lubricate, and replace instruments in its box.
Check yourself, what errors may remain in my measurement.
General Errors In Measurement With Vernier Caliper
The errors occurred in the vernier caliper due to its incorrect handling of the jaws on the workpiece. In measuring the outside diameter, it must be ensured that the caliper bar and the plane of the caliper jaws are truly perpendicular to the workpiece.
To avoid error you must ensure that the caliper is not tilted or twisted. But it happens because of the relatively long extension of the main bar of the average vernier calipers. The accuracy depends on the greater extent of the condition of the jaws of the caliper.
The accuracy of the natural wear and warping of vernier caliper jaws should be tested frequently by cooling them together tightly or setting them to the 0.0 point of the main and vernier scale.
In the above position when it is held against a light source, in case of wear, spring, or warp, a knock-kneed condition is observed, and if measurement error is greater than 0.005mm the instrument should not be used and sent for repair.
Whenever the wear or wrapping of the sliding jaw frame place it does not slide squarely and snugly on the main caliper beam, then jaws will appear. The jaws of the vernier caliper may become bowlegged or its outside edges are worn down while measuring the inside diameter.
Advantages and Disadvantages of Vernier Scales
Advantages
Amplification is achieved by design and it is not dependent on the parts that can go out of wear or calibration.
No interpolation is possible in reading, let alone required.
Zero setting adjustment is easy.
There is no theoretical limit to the scale range.
Disadvantages
The main disadvantages lie in the instruments on which verniers are used.
The reliability of reading depends more upon the observer than most instruments.
No way to adjust for any errors other than zero settings.
The discrimination is limited.
Download Pdf of this article
Now, I hope I’ve covered everything you were looking for about “types of gears“. If you still have any doubts or questions regarding this topic, leave a comment below I’ll reply. If you like it, then share this with your friends.
Want free PDFs direct to your inbox? Then subscribe to our newsletter.
Saif M. is a Mechanical Engineer by profession. He completed his engineering studies in 2014 and is currently working in a large firm as Mechanical Engineer. He is also an author and editor at www.theengineerspost.com
Without using upper and lower jaws and depth rod we have to find accurate measure of the any object how it could be u can than reply, proffesor has given the task.
A vernier is used to precisely measure linear dimensions. It is a useful tool to use when measuring the diameter of round objects like cylinders because the measuring jaws can be secured on either side of the circumference. Without these jaws, you can’t measure on the vernier caliper.


Thanks for the good information, I’m learning new things.
You’re most welcome.
Really great & elaborate article.
Thanks for reading 🙂
thanks for the article, i am learning physics this was very helpful
you’re welcome
It is very very helpful… 👍even I could not complete my assignment without the engineer’s post so I’m really very thankful to you
I’m happy to help 🙂
Without using upper and lower jaws and depth rod we have to find accurate measure of the any object how it could be u can than reply, proffesor has given the task.
A vernier is used to precisely measure linear dimensions. It is a useful tool to use when measuring the diameter of round objects like cylinders because the measuring jaws can be secured on either side of the circumference. Without these jaws, you can’t measure on the vernier caliper.
I spent a lot of time to locate something like this