In this post, you’ll learn what optical comparator and different types of optical comparator, it’s construction and working.
Optical Comparator and Types
The optical comparators are used for getting accurate measurements. There are no pure optical comparators but the instruments are classed as optical comparators to obtain large magnification by the use of optical principles through mechanical magnification in these instruments contribute quite a lot for the overall magnification.
In other words, the amplification of the measured quantity is done twice. One by using a simple mechanical system and again by using the optical system.
Read also: Mechanical Comparator: Types, Design, Working, Advantages and More
Working Principle of Optical comparator
All the optical comparators work on any one of the following principles:
- The use of the optical lever
- The use of enlarged image
1) Principle of Optical Lever:
When a beam of light AC is directed on to a mirror, it will be reflected onto the screen at ‘O’ as a dot. The angle ‘θ’ at which the beam hits the mirror is equal to the angle ‘θ’ at which the beam is reflected from the mirror.
The setup is as shown in the figure:
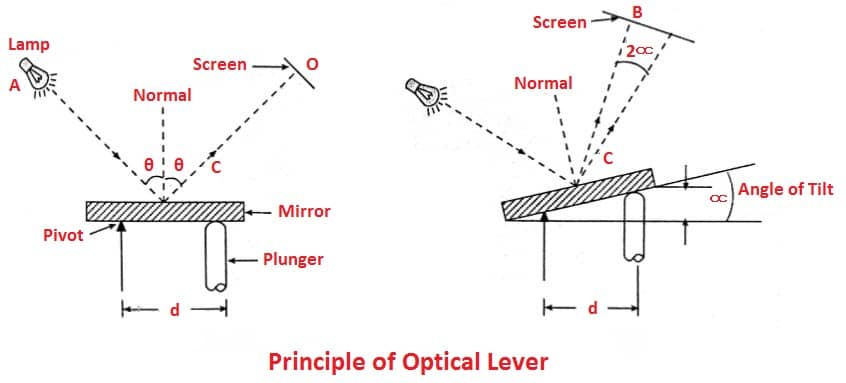
When the plunger moves vertically upwards, causing the mirror to tilt by an angle as shown in the figure, then the reflected light beam mores through an angle ‘2∝‘. Which the twice the angle of tilt produced by the plunger movement.
The lighted dot moves to ‘B’ thus a linear movement ‘h’ of a plunger creates a movement of the dot equal to the distance ‘OB’ on the screen.
It is also clear that as the distance ‘CO’ of the screen from the filling mirror creases, greater will be the magnification and is called “Principle of the enlarged image”
2) Principle of Mechanical – Optical Comparator:
The mechanical system has a lever fixed by the pivot and both the ends are fixed by the plunger. One end of the plunger touches the part to be measured and its moves accordingly. The fixed pivot causes the upward and downward motion of the lever which in turn causes the movement of the plunger fixed at the other end. All these parts constitute the mechanical system.
The setup of the mechanical optical comparator is as shown in the figure:
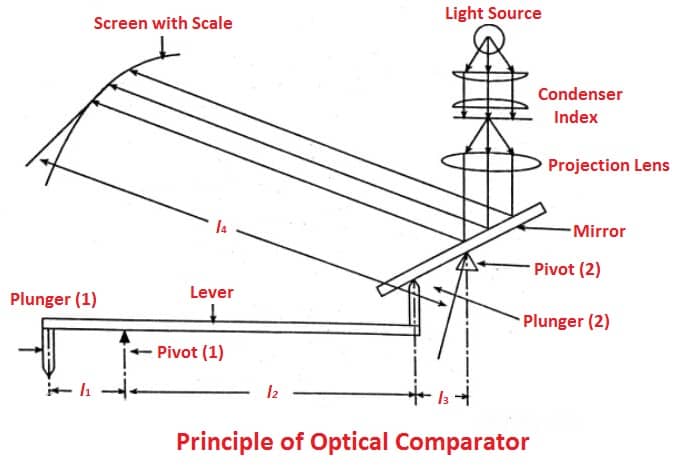
The optical system consists of a mirror, projection lens, condenser, light source etc. One end of the mirror is fixed to the plunger and pivot is fixed to the centre. The light emitted by the source falls on the mirror passing through the condenser and projection lens.
When the plunger moves up and down, the lever which is pivoted causes the same amount of motion for the other end, where the mirror is attached. Thus there is a movement of the mirror whenever there is a plunger movement.
The light falling on the mirror is thus reflected which can be measured Thus the magnification is done using the optical comparators.
Let,
l1 = Distance between the plunger (1) and pivot (1)
l2 = Distance between pivot (1) and plunger (2)
l3 = Distance between plunger (2) and pivot (2)
l4 = Distance between pivot (2) and scale
The mechanical amplification = l2/l1
The mirror is tilted by angle δθ = l4/l3
∴The image is tilted by an angle 2 x δθ
∴Optical amplification becomes = 2 x l4/l3

Types of Optical Comparators
Among the various types, the following are different types of optical comparators:
- Zeiss Ultra Optimeter
- Zeiss Optotest Comparator
- Newall OMS Horizontal Optical Comparator
- Eden-Rolt Millionth Comparator
Read also:
- How to use vernier calliper and Errors while measuring with this instrument
- Different Types of Micrometers screw gauge
- what is Mechanical Comparator and how it works?
1. Zeiss Ultra Optimeter:
The optical system setup of this instrument involved a double reflection of light. Thus obtaining a higher degree of magnification and it is considered to be a highly sensitive comparator.
The lamp sends the light rays to the green filter, which filters all but green light, which is less fatiguing to the eye. The green light then passes to a condenser via an index mark projects it on to a movable mirror M1, where it is reflected another fixed mirror M2, and then back again to the first movable mirror.
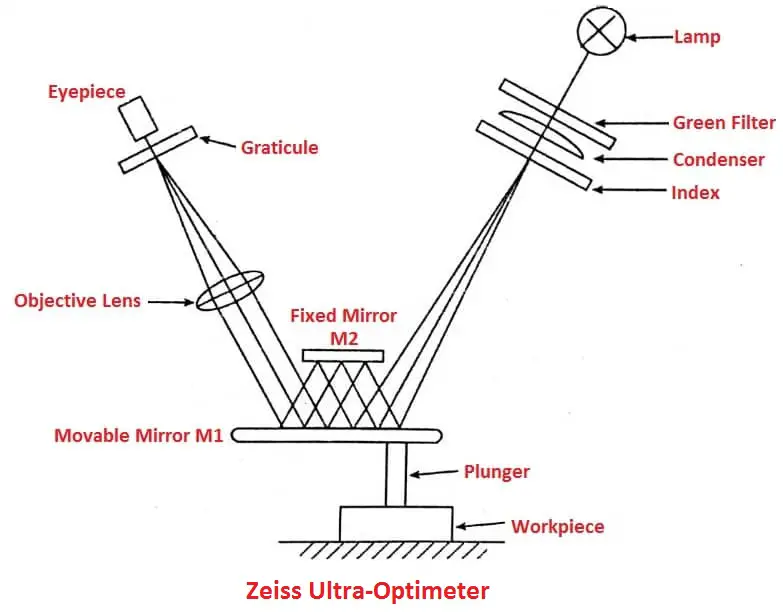
- The second objective lens focuses the reflected beam from the first mirror onto a transparent graticule that has a precise scale that is viewed by the eyepiece.
- The special end of the contact plunger rests against the outer end of the first moving mirror so that the mirror is tilted by vertical movement of the plunger. The sensitivity of this instrument requires special precautions in its operation to avoid temperature effects.
2. Zeiss Optotest Comparator:
- This is the commercial measuring instrument. It utilises a plunger titled mirror, objective lens, prism and observing eye-piece to provide a high degree of magnification.
- The mirror is mounted on a knife-edge and it can be tilted about the fulcrum by any linear vertical movement of the contact plunger.
- A beam of light passes through a graticule marked with a linear scale and the motion of the mirror moves this scale up and down past a translucent screen inside the instrument’s observational hood.
- The eye placed near the eyepiece views the image of a small scale marked on the glass after reflection from the plunger actuated mirror and the prism in the plan view of the figure “a” shown.
- In the local plane of the eye-piece, a fine reference line, the index is provided and the system of lenses is so arranged that the image of the scale is projected in the same focal plane. Thus with the movement of the scale, the image can be measured with reference to the fixed-line.
The division of a scale image opposite the index line shows the amount of movement of a contact plunger. The image of the scale and the index line can be viewed through a projection system.
The overall magnification of the comparator is given by 2f/d x eyepiece magnification. Where ‘f’ is the focal length of the lens & ‘d’ is the distance between the knife edge and the plunger.
3. Newall OMS Horizontal Optimeter:
This comparator is designed for very high magnification and it can measure very accurately with great precision in a horizontal direction. It is widely used to measure the internal and external dimensions of cylindrical gauges, screw gauges and thickness gauges.
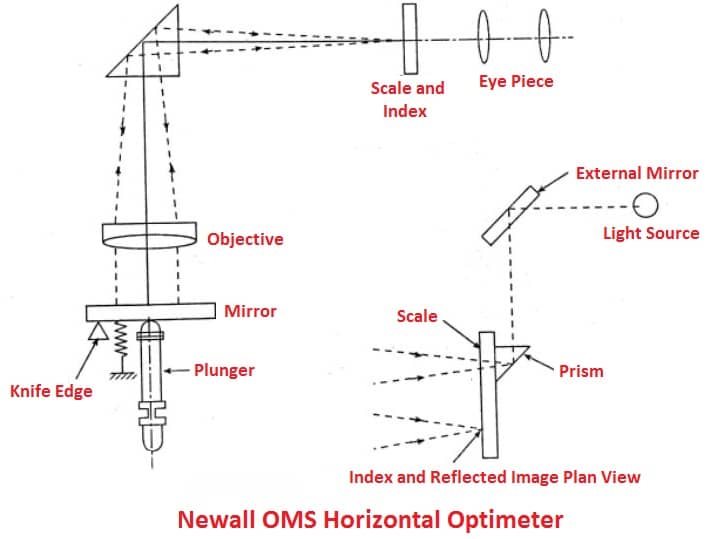
- The instrument consists of a cast iron base with three levelling screws and a spirit level for setting instrument horizontal. Two brackets are mounted on a transverse bar carried through the base.
- The brackets are kept in alignment by a keyway and a spline and carry an optical measuring head and a tailstock respectively.
The transverse bar is spiral grooved to allow easy and quick lengthwise adjustment of the bracket. For various works, there are other attachments. A vertically adjustable with both tilting & lengthwise movements are housed in the base.
Interchangeable heavy and light duty contact arms are provided for internal measuring and a centre cradle for male cylindrical work.
4. Eden-Rolt Millionth Comparator:
This comparator utilises both mechanical and optical magnification and thus is a highly sensitive one. The setup is shown below:
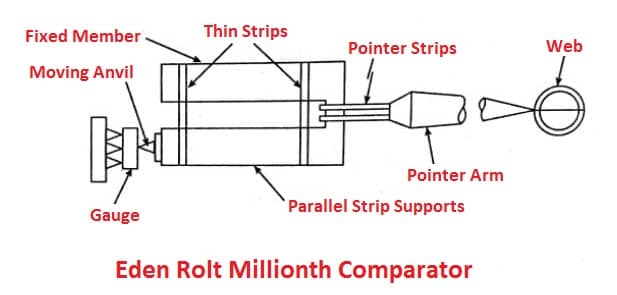
The mechanical amplifying device utilises parallel strip support, consisting of a fixed and a moving block connected together by parallel thin strips. Both the fixed and movable strips are connected to a pointer arm carrying web at the other and by two-pointer strips. In between of a fixed anvil and movable measuring block, a reference gauge is placed.
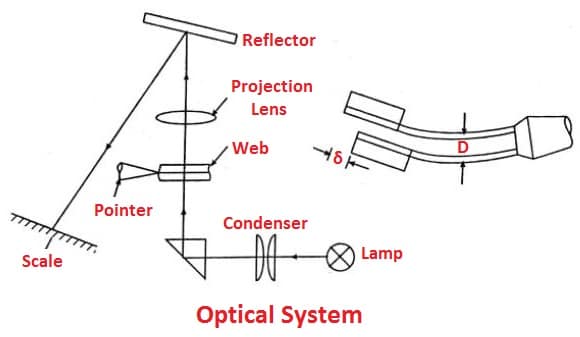
The slight movement or moving block through pointer strip causes the pointer arm to be deflected. The web at the end of the pointer arm is not viewed directly but it is projected through an optical system on the scale.
Measurement of magnification
Let ‘a’ be the distance between pointer strips, ‘I’ length of the pointer arm. for movement ‘δ’ of the movable member,
Angular deflections of pointer strips = (δ/a)
Linear displacement of web = (δ/a) x l
Mechanical Amplification = [(δ/a) x l]/δ = (l/a) which is of the order of 400
Optical magnification is the order of 50.
Overall magnification = (mechanical x optical) amplification
= (400 x 50) = 20,000 order.
Advantages of Optical Comparator
Following are the advantages of optical comparator:
- High accuracy will be achieved as it has very few moving parts.
- Less weight than other comparators because of fewer parts.
- The parallax error will be avoided.
- Due to the high magnification, very suitable for accurate measurement can be obtained.
Disadvantages of Optical Comparator
Following are the disadvantages of optical comparator:
- A separate power source is required.
- It is not suitable for continuous use due to the scale to be view through the eyepiece.
- It is suitable to use in a dark room only.
- Optical instruments are expensive.
Applications of Optical Comparator
Following are the applications of optical comparator:
- Optical comparators are widely used for complex-shaped stampings, cams, gears, threads, and compare to measured contour models.
- It is commonly used for measurement of optical devices.
- Optical comparators are widely used in the aviation and aerospace industry.
- The optical comparator is also useful in making of clocks and watches.
- An Optical comparator is commonly used in electronics, instrumentation industry and research institutes.
- The Optical Comparator is also used in major machinery manufacturing and detection of metering stations at all levels and etc.
That’s it, thanks for reading.
If you have any questions about “Optical Comparator” ask in the comments. If you like this article please share with your friends.
Read Next:
Thank for assistance us.
Happy to help 🙂
Engineers also want the applications of the optical comparator
Thanks for your comment 🙂